
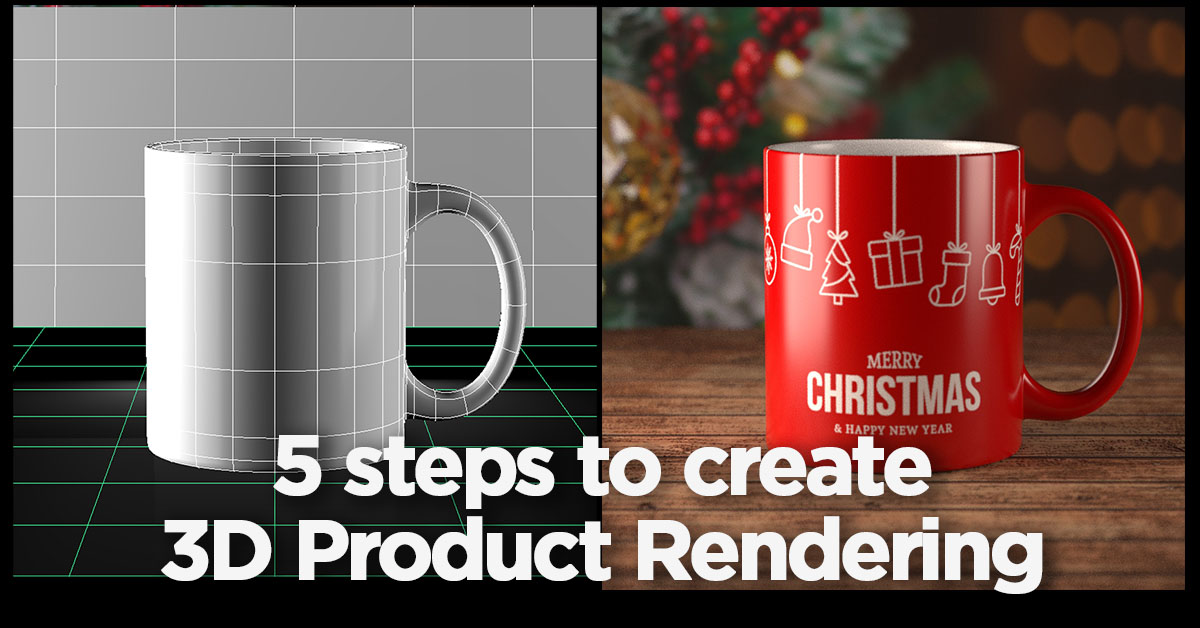
3D Product Rendering is the visualization of consumer product, mostly used for promotional images and illustrations. It is widely popular among marketers, as it allows them to test the product before production and optimize the business processes. 3D Rendering is the process of turning 3D models into 2D images using computer graphics software. This process is used in various industries, including architecture, product design, and scientific research. Here is the 5 essential steps to create 3D Photorealistic Product Rendering, that every 3D artist must know this.
5 Steps to make Photorealistic Product Rendering in 3D
1. 3D modelling
3D modeling is the creation of digital, three-dimensional graphics. There is a variety of 3D modeling software available that helps the users in sculpting, texturing, and designing 3D models. The art of 3D modeling is actually based on mathematics, and there are multiple techniques, workflows, and modeling software options to choose from. Thus, the creation of 3D models tends to be a more complex, time-consuming process. The good thing is that there are tutorials available for most of the 3D modeling software over the internet that can guide a user understand how to create a 3D model
2. UV mapping
UV mapping is the 3D modeling process of projecting a 2D image onto a 3D model’s surface. The UV Maps represent the basic principle of creating textures, which is used by all applications. The UV map is created after modeling a polygonal 3D model and has the same mesh structure as the 3-dimensional object, but all of those polygons are translated into 2D space, so they can be deformed.
3. Texturing and Material
Texturing is the process of adding graphics to a polygon object. These graphics can be anything from photographs to original designs. Textures can help age your object, and give them more appeal and realism.
Material controls how a 3D object appears on the screen.This means that most materials will take a texture as a parameter. Materials control the color of the object and how reflective or dull the surface appears.Many materials take multiple textures too.For instance, a material could use a diffuse texture, a normal map, and a specular map. These are all different types of textures but they work together to control the overall appearance of the object.
4. Camera Setting, and Lighting
3D Lighting is the collection of tools and techniques used to simulate light in a computer-generated 3D environment.Just like photography or filming, the lighting stage of the 3D render production pipeline is all about making a 3D scene or sequence visible in a specific way through setting up different sources of light.
5. Computer Rendering Processing
The process is carried out by computer. It involves creation of 3D images from the digital model according to preset parameters. Question that is of interest to all customers: duration of the process depends on the level of complexity of the object and the photorealism effect aspired.
To understand this 3D product rendering process, this is the “Step 1” 3D modelling video that shared on Youtube, You can find step 2 – 5 in the same channel and know how the consumer product rendering image be created.
please watch this video to get the idea for 3D product rendering.

Thank you for reading. Hope this can help!
Click here to subscribe this YouTube channel, more video will be shared with you. Let’s play with 3D CG together! Welcome to watch more video on【Youtube Playlist】
Continues Reading :
How AR, VR, 3D CGI technology benefit to E-commerce Retail (online marketing)
What is CGI ? Benefits to use CGI technology
Digital Art – Campbell Tomato Soup Can inspired by Andy Warhol – 3D CG Animation
Welcome to share with your friend
by artist.Bcgian.com
